Thursday, July 20, 2017

Pocketful of Sunshine Money Pocket

This is the card I made for my swap this month.  It uses the Pocketful of Sunshine stamp set and Pocket Framelits Dies.  I also used the Cupcake Cutouts for the banner.

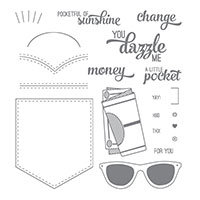
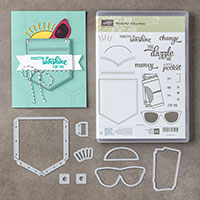
Directions on how I made my card:


1.      Base of card is Pool Party cut 4-1/4” x 11” and scored at 5-1/2” in the middle.
2.    The second layer is Pool Party cut at 4” x 5-1/4” and inserted into the Sparkle TIEF and run through the Big Shot and adhered to the front of the card with Multipurpose Glue.
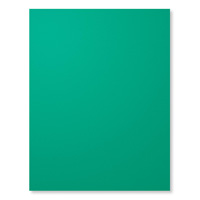
3.    Ink up the money stamp with the Basic Black ink onto the Garden Green cardstock.  Ink up the sunglasses with the Basic Black ink and stamp onto the Real Red cardstock.  Ink up the pocket stamp with 
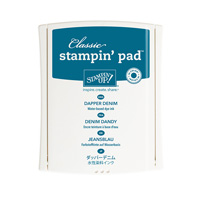
Dapper Denim ink for the trim.  Use the 
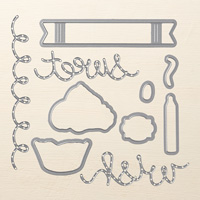
Pocket Framelit Dies to die cut each item.
4.    Ink up the “Pocketful of Sunshine” sentiment on Whisper White cardstock using Dapper Denim ink.  Use the Cupcake Cutouts banner to die cut the sentiment.
5.    Fold on the score lines of the pocket and banner. Add Tear and Tape.
6.    Add the banner below the pocket trim. (do the sides after adhering the twine)
7.    Wrap the Basic Black Baker’s Twine around the pocket under the sentiment and tie a bow.
8.    Remove the Tear and Tape and adhere the pocket to the front of the card.  Use Multipurpose Glue to do the sides of the banner.
9.    Use Multipurpose Glue on the back of the money and sunglasses and insert into the pocket.
Products I used:

Wednesday, July 19, 2017

Pocketful of Sunshine

This was a card that I made the other day almost casing the card on page 64 of the catalog but had to change it somewhat when I made a black ink smudge on the right side.  Here are my instructions:


1.     The base of the card is Pool Party cut at 5-1/2” x 8-1/2” and scored at 4-1/4” in the middle.
2.    Ink up the pocket stamp with Pool Party and stamp randomly on the front of the card. 
3.    Ink up the pocket stamp again with Memento Black and cut out 3 pockets.  Cut them out with scissors instead of the framelits.
4.    Ink up the sun stamp with Memento Black and stamp on Daffodil Delight cardstock.
5.    Ink up the sunglasses stamp with Memento Black and stamp on Real Red cardstock.
6.    Use the Pocket Framelits Die to die cut them out in the Big Shot.
7.    Adhere to the front of the card using adhesive and Dimensionals.  Trim off the excess pockets on either side with Paper Snips.
8.    Use Baker’s Twine around the middle pocket and tie a bow.
9.    Ink up sentiment “Pocketsful of Sunshine” with Island Indigo ink and stamp on ½” x 2-1/2” Whisper White cardstock strip.  Attach to the middle pocket with adhesive.

Products I used:

Monday, July 17, 2017

Lovely as a Tree - Polished Stone

This is almost a duplicate of a card that I made back in 2002-2003.   Glossy card stock is back, so it was a perfect time to show my customers yesterday at the club workshop how to do the Polished Stone technique using the Glossy card stock. Even the Lovely as a Tree set was available back then.  It's been around ever since I've been a demo.  The card stock back then was Glorious Green which is a close match to the Emerald Envy. 


1.     The base of the card is Emerald Envy cardstock cut at 5-1/2” x 8-1/2” and scored at 4-1/4” in the middle.
2.    The Glossy cardstock is cut at 2-1/2” x 4-3/4”.
3.    To do the Polished Stone onto the Glossy Cardstock:
Saturate a cotton ball with rubbing alcohol and set on the E clear block.  Add 3 drops each of the reinkers (Emerald Envy, Soft Sky and if you wish Lemon Lime Twist) to the cotton ball that is saturated with alcohol.  Now, dab the Glossy cardstock with it until you like the desired look.  You may take another dry cotton ball to dab off the excess and/or use the Heat Tool to dry the ink.
4.    Once it is dry, ink up the Lovely as a Tree stamp with Black Memento ink. Let dry or use Heat Tool again before adhering to the 2-3/4” x 5” Basic Black cardstock with Adhesive. 
5.    Attach to the top of the Emerald Envy base card leaving room for the “Happy Birthday” message from Happy Birthday Gorgeous or Milestone Moments stamp set at the bottom that will be stamped with Black Memento ink.

Products I used:

Country Flowers

This card was made with a new set called Country Flowers in the new 2024-2025 Annual Catalog on page 50.  The technique is called paper piec...