Stamp Set: Awesome Otters
Cardstock: Coastal Cabana, Misty Moonlight, Simply
Marbelous 6” x 6” DSP
Ink: Tuxedo Black Memento
Stampin’
Blends: Crumb Cake, Petal Pink, Pool Party
Other: Stampin’ Cut and Emboss Machine, Layering
Diorama Dies, Dimensionals, Stampin’ Seal, Paper Snips, Paper Trimmer
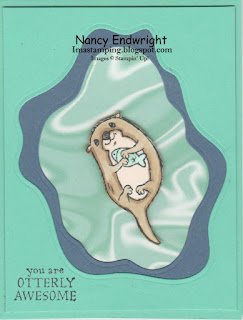
1. The base of the card is Coastal Cabana
cardstock cut at 4-1/4” x 11” and scored at 5-1/2” in the middle.
2. The second layer is Coastal Cabana
cardstock cut at 4” x 5-1/4” and die-cut with the third from the largest
Layering Diorama Die.
3. The Misty Moonlight cardstock layer is cut
at 3-3/4” x 5” and die-cut with the fourth from the largest Layering Diorama
Die.
4. Cut the Simple Marbelous DSP at 4” x 5-1/4”
and adhere to the back of the Diorama Layers.
Attach to the front of the card with Adhesive.
5. Ink up the otter with the fish with Tuxedo
Black Memento ink and color in with the Stampin’ Blends. Color the otter Crumb Cake, his belly Petal
Pink, and the fish Pool Party. Use the
Paper Snips to fussy cut the otter out. Add
the Crumb Cake on the edges of the otter to cover up any white showing. Add
Dimensionals to the back and attach to the Simply Marbelous paper.
6. Ink up the sentiment “You are Otterly
Awesome” in the lower left-hand corner with Tuxedo Black Memento.
Products I used:


")


 Host Designer Series Paper")


 Gingham Ribbon")


")


