
Thursday, December 31, 2015
Rose Wonder Birthday
Tuesday, December 29, 2015
Sleigh Ride Edgelits Ornament Card

This is was a fun ornament card I made after learning how to make it from Michelle Zindorf. It uses the Sleigh Ride Edgelits Dies which retire soon. It also uses the Embellished Ornaments Thinlets Die that is not retiring yet. I used the Hardwood Background Stamp. The colors are Island Indigo, Old Olive, Whisper White cardstock. I love how it turned out.
Tuesday, December 15, 2015
Embellished Ornaments

Tuesday, December 8, 2015
Christmas Card Swaps


Snow Place


Thanks Dianne for your swap. I really liked it.
Here is Dianne's card:

Rudolph Gift Card Holder Envelope

This is the other project we made at my workshop on Sunday. The idea came from a video I saw of Connie Stewart's, but I used the Holidays Fancy Foil Designer Vellum for the front of my Gift Card Envelope. I loved her Rudolph the Red Nose Reindeer and knew I had to make one. I also used it for my club workshop on Sunday. I used several punches to create Rudolph as you can see in the chart I made below..

Thursday, December 3, 2015
Snow Place Snowman

Let it Snow! Let it Snow! Let it Snow! We did have some snow fall today but not enough to accumulate or even to make a snowman. So I made a snowman card using the Snow Place stamp set. The base of card is Whisper White layered with Lost Lagoon. I stamped the snowflakes with Craft White. I stamped the snowman with Memento Black ink and cut him out with the coordinating Snow Friends Framelits. The snow and trees in background are cut from the Sleigh Ride Edgelits (soon to retire). I wasn't crazy about the Sleigh Ride Edgelits when I first saw them, but have seen so many beautiful cards made with them. It will be sad to see them go. I stamped "Let it Snow!" on Whisper White and I used the Hexagon punch on the one end to create a banner.
Wednesday, December 2, 2015
Cozy Christmas and Cheer All Year
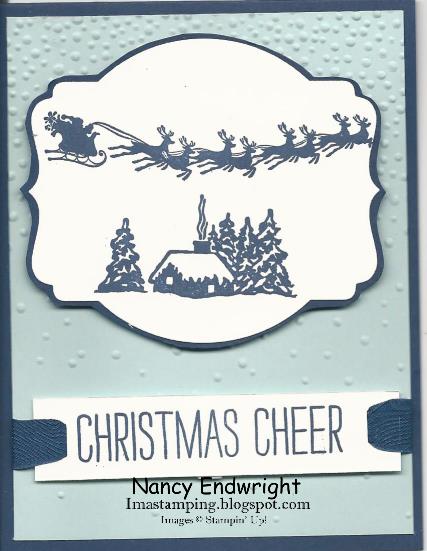
This is a card I made with Night of Navy and Soft Sky cardstock.
I ran the Soft Sky through the Big Shot using the Softly Falling TIEF.
The "Christmas Cheer" is from Cheer All Year stamp set that will soon retire.
Santa and his reindeer are also soon to retire from the set Cozy Christmas set.
I used the new Curvy Corner Trio Punch that will not retire and will still be available in the new Occasions Catalog that comes out January 5. The punch has a ribbon slide which I punched at both ends of my banner to slide the Night of Navy 1/2" seam binding through. The punch also has two corner shapes.
Saturday, November 28, 2015
Winter Wishes

Monday, November 23, 2015
October Swaps
A few months ago, I posted the swaps for September with a group that I swap with monthly. I have permission to post the following swaps for October. I will post November swaps when they all arrive. They are a great group of stampers.

Created by Diane Simpers

Created by Dianne Teslak

Created by Lynn Lipchak

Created by Mary Wesche

Created by Toni Tessler

Created by Nancy Endwright
Sunday, November 22, 2015
Sparkling Seasons Viewmaster Card

Stamp Set: Sparkling Season (Bundle)
Cardstock: 5” x 10” Soft Suede, Crumb Cake, 5” x 5”
Thick Whisper White and Copy Paper, 3” x 5” Merry Moments DSP, Gold Glimmer
Paper
Ink: Soft Suede, Memento Black Ink
Markers: Old Olive, Cherry Cobbler, Daffodil Delight,
Island Indigo, Blush Blossom
Other: Big Shot, Circle Collection Dies, Seasonal
Frame Thinlets, Dimensionals, 2-Way Glue Pen, Tombow Multipurpose Glue Pen,
Paper Snips, Bone Folder, Paper Piercing Tool and Mat, Mini Brad, eraser
1.
This card is
a 5” x 5” card. The base of the card is
Crumb Cake cut at 5” x 10” and scored in the middle at the 5” mark. Use the Bone Folder to burnish the fold to
lie flat.
2.
The Merry
Moments DSP is cut at 3” x 5”. Put
Tombow Multipurpose Glue around the edges and adhere to the middle of the card.
3.
With a
pencil and clear ruler, measure at the top of the card at 2½” and make a pencil
mark below that mark at ¼”.
4.
Open up the
card and use the fourth from the smallest circle die from the Circle Collection
Dies and lay it at the ¼” pencil mark down and center on the DSP to cut out a
circle through both front layers using the Big Shot/Magnetic Platform.
5.
Then on the
side, measure 2½”, mark it 3/8”. Use the same Circle die and with the card
closed, lay it just left of the 3/8” mark and run it through the Big Shot to
create a thumb hole.
6.
To find the
center of your card for the Mini Brad, close your card and measure with a clear
ruler from one corner of the card to the other and make a small pencil mark in
the middle. Do the same so that there is an “x” where they meet in the
middle. Use the Paper Piercer and Mat to
make a hole in the center of the “X”.
7.
Use the 5” x
5” Thick Whisper White Paper to cut out the large Scallop Circle and a piece of
5” x 5” white copy paper at the same time.
8.
Take the
copy paper and fold it in half, but make sure you have full scallops (not halves)
on the fold. Lay it on top of your Thick
Whisper White Scalloped circle, and use the pencil to draw a light line on the
Thick Whisper White Scallop Circle.
9.
Now, count
over 7 scallops and make a pencil mark and then count 8 scallops and make
another pencil mark. Use the folded copy paper as your guide to draw the pencil
lines across the scallop circle to make 6 pies.
Using the mat, insert Paper Piercer in the center where lines meet. Insert a brad in the front of the card first
and then add your scallop circle so you can find placement for you to stamp the
images. Start where the line is straight
up and down, and then take a pencil and draw the circle.
10. Move it past the next line, draw another circle, skip a line and
draw the last circle.
11. Remove the brad and your scallop circle from the card for
now. Stamp an image in each circle with
Memento Black ink. Let dry!
12. Erase all pencil marks. Color images in with markers.
13. Insert scallop circle back into card with the brad.
14. Stamp base of snow globe on 3” x ½” Crumb Cake cardstock with Soft
Suede ink. Adhere with two Dimensionals.
15. Cut out Gold Glimmer “Falala” from the Seasonal Frame Thinlets, using
Big Shot with an extra “lala”. Use 2-Way Glue Pen to adhere to the front of
the card. Let dry!
Thursday, November 12, 2015
Tuesday, November 10, 2015
Monday, November 9, 2015
Antique Tags

DO NOT OPEN UNTIL CHRISTMAS!!! That is what this Santa is saying. He is from the hostess set Antique Tags. This was a box that I made using Real Red and Mossy Meadow cardstock.
The Designer Series Paper is called Home for Christmas. The ribbon is the 5/8" Gold Satin Ribbon and it uses the 2" and 2-1/2" Circle Punches. The measurements for the box can be found on Angie Juda's blog HERE. Her box is a snowman made with the Snow Place stamp set.
Friday, November 6, 2015
Square Pillow Box

This was a project so much fun to make but it was not my original idea. I found a video on how to make this box on Splitcoaststampers by JanB. The base is Marina Mist using the Woodland TIEF and using a Dauber and Craft White ink. It also uses a 2-Way Glue Pen and Dazzling Diamonds. The little snowman on the NoteTag is from Sparkling Seasons colored in with Marina Mist, Soft Sky and Pumpkin Pie markers adding more Dazzling Diamonds which makes a nice little gift box for someone at Christmas time. Wouldn't you love to receive this gift?
Tuesday, November 3, 2015
Festive Leaves

This is a card I did for a swap this month. It makes a great Fall card and I'm glad to have used my
Leaflet Framelits that I have had for a few months just waiting to create a Fall card.
STAMP SETS: Festive
Leaves, Happy Scenes, For All Things
Cardstock: Cajun
Craze, Crumb Cake, Whisper White
Ink: Cajun Craze,
Basic Black, Soft Sky, Old Olive
Markers: Pumpkin Pie, Old Olive, Cherry Cobbler,
Other: Big Shot,
Leaflet Framelits, 2” Circle Punch, Sponges,
Woodland TIEF
Friday, October 30, 2015
Happy Scenes - Winter

This is another card my club members made at our workshop on Sunday.
Stamp Set: Happy Scenes (2015 Holiday Catalog)
Cardstock: Whisper White, Night of Navy, Silver Foil, Season
of Cheer DSP
Ink: Versamark
pad, White Embossing Powder, White Craft
Other: Big Shot, Precision Plate, Hearth & Home
Thinlets Die, Christmas Greetings Thinlets Die, Heat Tool, Snowflake Elements,
Glue Dots, Dimensionals, 2-Way Glue Pen
1.
Base
of card is Whisper White cardstock cut at 4¼” x 11” and scored at 5½” in the
middle.
2.
The
second layer is Night of Navy cut at 4” x 5¼”.
3.
The
third layer is Season of Cheer DSP cut at
3¾”
x 5”
4.
Layer
the Night of Navy on the base of the card with Adhesive and then layer the DSP
on top of it with Adhesive.
5.
The
window frame thinlet is cut from 3¾” x 3”
Whisper White cardstock. Use the Big Shot and Precision Plate, steel facing up and the writing facing down. It is used in place of a cutting plate and used on Tab 2. Then lay down the white cardstock for window frame and then the Heart & Home Thinlets Die and a cutting pad on top.
Whisper White cardstock. Use the Big Shot and Precision Plate, steel facing up and the writing facing down. It is used in place of a cutting plate and used on Tab 2. Then lay down the white cardstock for window frame and then the Heart & Home Thinlets Die and a cutting pad on top.
6.
The Night of Navy strip is 1½” x 3¾” for the window
sill. It can be used with the Magentic
Platform and two cutting plates.
7.
The 2½”
x 3” Night of Navy cardstock is used for the scene behind the window. Use the Embossing Buddy before stamping the
winter scene in Versarmark. Then
sprinkle White Embossing Powder over it.
Shake off excess and use the Heat Tool to emboss it. Optional: You may reink scene with Versamark and
sprinkle Iridesent Embossing Powder over the first embossed trees and heat
set. Attach to the back of the window frame with
adhesive. Add Dimensionals to the back
and adhere window frame/scenery to the front of the card.
8.
Carefully, ink up a wooden Snowflake Element with White Craft
ink and let dry. Can use Heat Tool to
get it to dry faster. When dry, attach
to window frame with Dimensional or Glue Dot.
9.
Silver Foil is cut at 3½” x 1¼”. Use “Peace” die from the Christmas Greetings
Thinlets Dies to cut out in the Big Shot using Precision Plate.
10.
Attach to the Night of Navy window sill with 2-Way Glue Pen. Attach below window frame with Dimensionals.
Tuesday, October 27, 2015
Monday, October 26, 2015
I Believe in Santa

Here are the instructions:
Cardstock: Lost Lagoon, Mossy
Meadow, Whisper White
Ink: Archival Basic Black, Lost
Lagoon, Mossy Meadow
Other: Big Shot, Multipurpose
Platform, Brayer, 2” Circle Punch, Woodland TIEF, Washi Punch, Post-it note, Dimensionals,
Snail Adhesive, Multipurpose Glue
1. Base of card is Lost Lagoon cut at 5½” x 8½”
and scored at 4¼” in the middle.
2. The second layer is Mossy
Meadow cut at 4” x 5¼” and
adhered to the base of the card with Snail Adhesive or Tombow Multipurpose Glue.
3. Ink up Santa and his
sleigh from the Cozy Christmas stamp set with the Archival Basic Black ink pad. Stamp on the 3¾” x 5” Whisper
White cardstock starting in the middle and up towards the right corner as if
they are flying.
4. Cut a 2” circle from a
post-it note making sure you include the sticky part. Adhere it over Santa and his sleigh.
5. Ink up the Brayer with
Lost Lagoon ink. Brayer across the
Woodland TIEF on the logo side.
6. Then ink up the Wonderland
trees with Mossy Meadow ink and stamp on the TIEF towards the bottom.
7. Now place your “Santa and
sleigh” Whisper White cardstock
on the opposite side of the TIEF (less chance of ink smearing) and run it
through the Big Shot using the Multipurpose Platform on Tab 1 and make sure you
run it through with the fold in the TIEF goes in first. Carefully lift off the TIEF when done. Adhere to front of card.
8. Stamp “Believe” from the
Jolly Christmas set with Lost Lagoon on Whisper White scrap and punch it out
with the Washi Punch and adhere to front of card with Dimensionals.
Optional: Use a 2-Way Glue Pen on
the Mossy Meadow trees and sprinkle Dazzling Diamonds. Shake off excess and let dry!
Subscribe to:
Posts (Atom)
Fern & Flora - "You Make the World a Better Place"
Here is another card that I made using the Moonlit Flora Designer Series Paper. It is so beautiful that it really makes the card without pu...

-
 Just couldn't resist making another card using the Swirly Scribbles Thinlets to make a snowman. Seongsook Duncan had posted her vers...
 -
 This card uses a lot of the new products in the 2016-2017 Annual Stampin' Up! Catalog. The new stamp set is called Seaside Shor...
 -
 Just finished making this fun waterfall card this morning. I love making waterfall cards, so I had to play around with thi...