Thursday, October 27, 2022

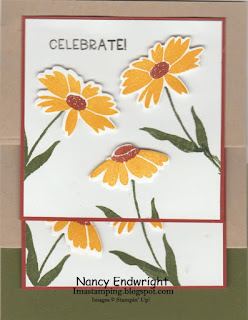
Sending Smiles and Framed Florets


This is a fun-fold card or an Accordion Card made with Sending Smiles and the new Framed Florets that I made for a fun-fold swap for this month.  The Framed Florets will be available on November 1.  I learned the fun-fold from Jackie from Klompenstampers but I added the new set instead of the one she used.  Here are the products I used:

Stamp Sets:  Sending Smiles and Framed Florets

Cardstock:  Crumb Cake, Cajun Craze, Mossy Meadow, and Basic White

Ink:  Crushed Curry, Mossy Meadow, Early Espresso

Other:  Stampin’ Cut and Emboss Machine, Framed Floret Dies, Simply Scored Scoring Tool, Bone Folder, Multipurpose Liquid Glue, Mini Dimensionals


Product List

Sunday, October 23, 2022

Scary Cute - Fun Fold

This is a fun-fold card that I cased from Michele Reynolds.  I recently bought this set and needed to make a fun-fold card for a swap.  It was such a cute card, I decided it was too adorable not to make one of my own.  I love the Gingham Cottage DSP to go with it.  Both are in the 2022 Holiday Mini Catalog.


Stamp Set:  Scary Cute

Cardstock:  Pumpkin Pie, Basic Black, Basic White, Gingham Cottage DSP

Ink:  Tuxedo Black Memento

Other:  Paper Trimmer, Stamparatus, Tear and Tape, Multipurpose Liquid Glue


1.     The base of the card is Pumpkin Pie cardstock cut at 5-1/2” x 7” and scored at 2-3/4”

2.    Cut Basic Black cardstock at 4” x 5-1/4” and the Gingham Cottage DSP at 2-3/8” x 5-1/8”.  Ink up the “Boo” with Tuxedo Black Memento and stamp randomly in the diagonals of the DSP.  Layer together and add to the front of the card.

3.    For the inside:  Cut Basic Black cardstock at 4” x 5-1/4” and Basic White cardstock at 3-7/8” x 5-1/8”.  Ink up the bats' stamps in the upper right-hand corner with Tuxedo Black Memento ink.  Ink the lantern boy stamp with Tuxedo Black Memento ink in the lower right-hand corner.  Use the Stamparatus to clear, sharp images.  Adhere to the Basic Black layer.  Set aside.

4.    Cut the flap from Basic Black cardstock at 1-5/8” x 3-3/4” from Basic Black cardstock and score at 3”.  Set aside.

5.     Cut two each of 1-3/4” x 3-1/4” from Basic White cardstock.  She used the Stitched Rectangles for this.  Ink up the three trick-or-treaters with Tuxedo Black Memento ink on one of the Basic White rectangles and on the other one ink up the sentiment “Trick or Treat You’re So Sweet” and adhere to the Basic Black flap.

6.    Adhere Tear and Tape to the small end of the Basic Black Flap and adhere to the back of the inside layers so that the trick-or-treaters can be folded to the front.  Add Multipurpose Liquid Glue to adhere the 4” x 5-1/4” to the inside making sure the flap folds to the front of the card showing the trick-or-treaters.


Product List
 

Saturday, October 22, 2022

Framed Florets - Happy Birthday Card

This is a card that I made using the new Framed Florets stamp set that will be in the new 2023 January-June.  It is an Early Release for demonstrators but will be available for customers on November 1, 2022.  I also used the sentiment from Peaceful Moments and this card to make my birthday cards for this month for family and friends.

Stamp Sets:  Framed Florets, Peaceful Moments

Cardstock:  Night of Navy, Basic White, Balmy Blue, Fitting Florets DSP

Ink:  Night of Navy

Other:  Stampin’ Cut and Emboss Machine, Fabulous Frames, Multipurpose Liquid Glue, Dimensionals


1.    The base of the card is Night of Navy cardstock cut at 5-1/2” x 8-1/2” and scored at 4-1/4” in the middle.

2.    The second Layer is Basic White cardstock cut at 3-7/8” x 5-1/8”.

3.    The third layer is Balmy Blue cardstock cut at 3-3/4” x 5”.

4.    The fourth layer is Fitting Florets DSP cut at 3-5/8” x 4-7/8”.

5.    Layer all layers with Multipurpose Liquid Glue and adhere to the Night of Navy card base.

6.    Die-cut an oval from the Fabulous Frames using Basic White and Balmy Blue.

7.    Use the Basic White Frame to adhere to the middle of the card. 

8.    Ink up the “Happy Birthday” sentiment from the Peaceful Moments stamp set with Night of Navy ink on the Balmy Blue oval.  Attach with Dimensionals in the center of the Basic White Oval frame.

I will add the items to my 24/7 Store once they become available to customers.

Monday, October 17, 2022

Perched in a Tree - Christmas Card

This a Christmas Card using the Perched in a Tree stamp set. MY WEBSITE STORE  It is so versatile!  It can be used for all four seasons.  It is one of my favorite stamp sets in the Holiday Mini Catalog for 2022.
I used another set from the Annual Catalog called Season of Chic to create the silver snowflake HERE
I think Night of Navy Cardstock, Silver Foil, and Basic White make great winter scenes for Christmas cards.  I was inspired by Lois Rist for this card who is another demonstrator.

Stamp Set:
  Perched in a Tree, Season of Chic

Cardstock:  Night of Navy, Silver Foil, Basic White

Ink:  Versamark, White Embossing Powder, Night of Navy

Other:  Stampin’ Cut and Emboss Machine, Aspen Tree Dies, Stylish Shapes Dies, Chic Dies, Embossing Buddy, Heat Tool, Multipurpose Liquid Glue, Dimensionals, Glue Dots


1.     The base of the card is Night of Navy cardstock cut at 4-1/4” x 11 and scored at 5-1/2” in the middle.

2.    The second Layer is Silver Foil cut at 4” x 5-1/4”.  Die-cut snowflakes out of the center of the Silver Foil.   (Waste Not Want Not!-the die-cuts won’t show if you die-cut them from the center).

3.    The third layer is Night of Navy cardstock cut at 3-7/8” x 5-1/8”.  Use the Embossing Buddy to cover it to remove excess moisture from the cardstock. Take the “Splotchy” stamp inked up with Versamark and randomly stamp all over.  Sprinkle White Embossing Powder over the splotches and heat set with the Heat Tool.  The powder will turn shiny when it is completely embossed. This will represent snowflakes in the background.

4.    The fourth layer is Basic White cardstock cut at 3-7/8” x 5-1/8” (same as the Night of Navy layer).  Die-cut the Aspen Tree Die in the Stampin’ Cut and Emboss Machine with Basic White cardstock.

5.    Attach the Night of Navy “Splotchy snowflakes” to the Basic White Aspen Tree die-cut with Multipurpose Liquid Glue.  Attach to the Silver Foil Layer and all to the base of the card.

6.    Ink up the sentiment “Wishing You Abundant Joy and Peace” with Versamark ink on the right side of the Night of Navy Banner cut out with the Stylish Shapes Dies.  Emboss it with White Embossing Powder and heat it with the Heat Tool until it is shiny.  Attach to the bottom of the tree with Dimensionals.

7.    Add a tiny Silver Foil Snowflake with a Glue Dot.

8.    Inside:  Basic White Cardstock cut at 4” x 5-1/2”.  Stamp the large snowflake from the Season of Chic stamp with Night of Navy ink.

Product List

Sunday, October 16, 2022

Scary Cute Silhouettes Card

This is a card I cased from Michelle Zindorf.  It was so adorable I had to make one and I hope to teach my club members how to make one too.  Her video was free to anyone on YouTube.  She is such a talented artist.  I love her cards.  I made a few other cards with variations using different embossing folders and different ribbons.
This one uses the Glitter Washi Tape from the 2022 June-December Mini.  I also used the Quatrefoil Tile Embossing Folder from the Annual Catalog.

This one uses the 1-1/2" Metallic Mesh Ribbon and Brick & Mortar 3D Embossing Folder from the Annual Catalog.


Stamp Set:  Scary Cute

Cardstock:  Basic Black, Basic White

Ink:  Tuxedo Black Memento, Pumpkin Pie, Old Olive, Cajun Craze, Gorgeous Grape, So Saffron, Gray Granite

Other:  Stampin’ Cut and Emboss Machine, Layering Circles Dies, Stamparatus, Blending Brushes, White Gel Pen, Quatrefoil Tile Embossing Folder or Brick and Mortar, Black and White Gingham Ribbon or Glitter Washi Tape or Metallic Mesh Ribbon, Multipurpose Liquid Glue, White Gel Pen, Post-it Note


1.     The base of the card is Basic Black cardstock cut at 5-1/2” x 8-1/2” and scored in the middle.

2.    The second layer is also Basic Black cardstock cut at 4-1/4” x 5-1/2” and inserted into the Embossing Folder of choice.  Wrap ribbon around the bottom and secure in back with tape.

3.    The Basic White cardstock is 4” x 4”.  Place the post-it note circle at the top middle to create the moon.

4.    Take the Pumpkin Pie ink pad and a Blending Brush and make circular motions around the moon, but leave white space at the bottom.

5.    Take the Cajun Craze ink and a Blending Brush and make circular motions about halfway down the Pumpkin Pie.

6.    Next, take Gorgeous Grape and a Blending Brush to make circular motions at the very top to create a night look.

7.    Remove the post-it note and add So Saffron ink with the heaviest in the center of the moon using a circular motion.

8.    At the very bottom, in the white space, add Old Olive and a Blending Brush in a circular motion but leave a small layer of the white space for where they will walk.

9.    Insert the 4” x 4” in the Stamparatus.  Ink up the three Scary Cute kids with Tuxedo Black Memento.  You may need to do it several times to create the silhouettes.

10.  Ink up the sentiment “Trick or Treat, You’re So Sweet” with Tuxedo Black Memento and insert it into the moon.  Add bats with Tuxedo Black Memento.  Emboss the Basic Black front layer with the Embossing Folder of choice and wrap the ribbon of choice around the bottom.

11.   To create the shadow, you will need a Gray Granite ink pad and a heavy piece of plastic (from an old Stamp-a-ma-jig).  Remove the Scary Cute kids from the Stamparatus, and stamp each one at a time on the plastic.  Place below the correct kid but upside down so that their feet match up.  Press your fingers on the plastic to push the ink into the paper.  Use the White Gel Pen to create the moon shining on their heads, arms, etc.

Product List

Documenting the Day

This is a 2025 Sale-a-Bration card I made with Documenting the Day and the 12" x 12" Bloom Impressions DSP which is also a SAB fre...