

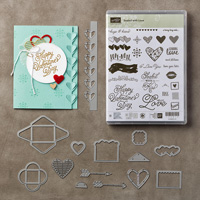
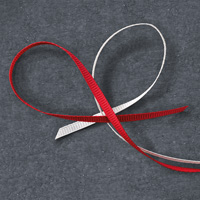
Have you ever made a Flip Tag Card? I made another one back in January 2008 with instructions from Phyllis M. Strickland and decided to bring back this technique with newer stamps. The older version I made is posted on my blog HERE I did make a few adjustments on this card too. I chose the Sealed with Love stamp set in the Occasions catalog. Some of the other products I used were the Happy Heart Textured Impressions Embossing Folder TIEF, the Stitched Shapes Square Framelits, Love Notes, Framelit Dies, Scalloped Tag Top Punch, Sending Love Ribbon, 1-3/8" Circle Punch, and a strong adhesive such as Fast Fuse or Tear & Tape. Here are the instructions for my card.
1. The base of my card is Real Red cut at
4-1/4” x 5-1/2.” Use the 1-3/8” Circle Punch to make a half moon in the center
at the very top of the cardstock.
2. The second layer is Whisper White cut at 4”
x 5-1/4.” Cut a half moon at the top of
it too.
3. Using the Paper Trimmer on the Whisper
White cardstock, go down 1-3/4” from the top and cut at 1-1/4” down the side
until you are at ¾” from the bottom. Do
the same on the other side.
4. Cut across at the bottom of the ¾” side and
cut with the trimmer to the other side to form a rectangle but only sides and
the bottom. DO NOT CUT THE TOP! Score the top with the scoring blade on the
Paper Trimmer at the 1-3/4” down point.
This will be called the “flipper.”
5. Apply scotch tape along the top and the
sides but away from the flipper section to strengthen the card.
6. Score the flipper at 5/8” from the
bottom. Fold and burnish. Then bring the folded end to the top of the
first score line to make another score line in the middle. The top and bottom are valley folds; the
middle is a mountain fold.
7. Now insert the 4” x 5-1/4” Whisper White
into the Happy heart TIEF, but make sure the hearts go in the right direction
on the front of your card. When you run
it through the Big Shot, make sure the hinged end of the TIEF goes through
first so it may appear your hearts upside down.
8. Now to make the Real Red pull tag, it
should be 2” x 4-3/4” long to start.
Insert it into the Scalloped Tag Topper Punch and punch to give it a
scalloped edge.
9. On the back side of the Whisper White, on
the 5/8” of the “flipper” attach Tear & Tape. Attach the bottom of the tag so that it is
lined up with the bottom of the flipper.
10. Die cut at Real Red Square with the
Stitched Shapes in the Big Shot. Die cut
a Whisper White Square with the smaller Stitched Shapes in the Big Shot.
11. Stamp the “heart” from Sealed with Love on
the white square with Real Red ink.
12. Layer onto the White square with
adhesive. Apply Tear & Tape between
the 5/8” fold and the middle fold keeping it away from the other folds.
13. Attach the stamped square images to this
section. Your “flipper” is done!
14. Apply
Tear & Tape to the sides and bottom edges of the layer (not the
flipper). Be sure to keep the Tear &
Tape at the top on either side of the scalloped tag so that it will not
interfere with the flipper.
15. Attach to the front of the Real Red card
front.
16. Pull the tag out. Stamp “Sealed with a Kiss” on the opening
with Memento Black ink and/or decorate the front to your liking with Sealed
with Love stamps.
17. For the top, stamp hearts on Whisper White
cardstock and die cut with the Love Notes Framelits Die and stamp the sentiment
“Love You Lots” underneath the hearts.
Attach with adhesive at the top of the Scalloped Tag Topper.
18. Attach Sending Love Ribbon at the top
through the Tag Topper Punch hole.
Products I used:


No comments:
Post a Comment
Thanks for taking the time to comment on my blog. You have made my day!