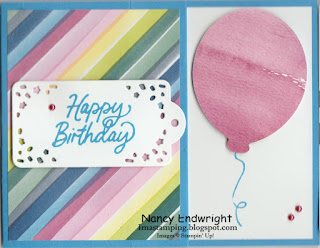
Stamp Set: Beautiful Balloons
Cardstock: Azure Afternoon, Basic White, 6” x 6” Bright
& Beautiful DSP
Ink: Azure Afternoon
Other: Stampin’ Cut and Emboss Machine, Paper
Trimmer, Bone Folder, Beautiful Balloons Dies, Multipurpose Liquid Glue, Stampin’
Dimensionals, Festive Pearls
1. The base of the card is the new Azure
Afternoon cardstock cut at 4-1/4” x 11” and scored at 5-1/2” and 2-1/4”.
2. The Bright & Beautiful DSP is cut at 3”
x 4” and adhered to the front of the card with Multipurpose Liquid Glue.
3. Ink up the sentiment “Happy Birthday” with
Azure Afternoon ink on Basic White cardstock.
Die-cut with the confetti label die from the Beautiful Balloons Dies. Adhere to the front with Stampin’ Dimensionals.
4. For the inside flap: Use Tear and Tape on either side of to create
a pocket for a gift card or money. Use a
1” punch to create a half-moon to make it easier to remove a gift card.
5. For the inside: Cut Basic White cardstock at 4” x 5-1/4” and
ink up the sentiment “I think it’s time for a Celebration” with Azure Afternoon
ink on the left side.
6. Ink up the string stamp with Azure
Afternoon ink and stamp on the right side of the inside. Die-cut a large balloon from the DSP. Attach the balloon to the string with Stampin’
Dimensionals.
7. Add 3 Cherry Cobbler Festive Pearls to the
card.


No comments:
Post a Comment
Thanks for taking the time to comment on my blog. You have made my day!