Showing posts with label Circle Punches. Show all posts

Saturday, February 9, 2019

Dear Doily with Flowers


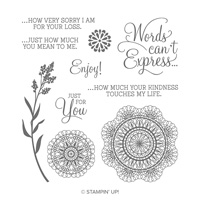
The Dear Doily stamp set in the 2019 Occasions catalog is a favorite of mine, but I hadn't tried using the flowers yet, so decided I would make a card using them today.

Here are my instructions:

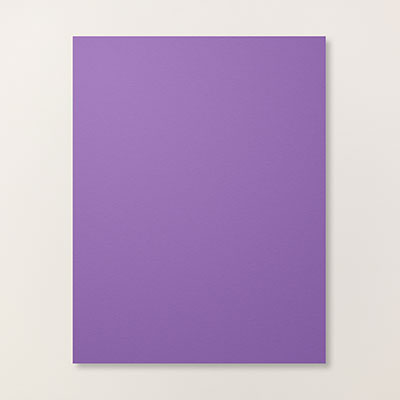
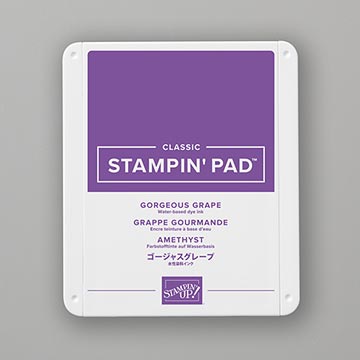
1.     Base of the card is Gorgeous Grape cardstock cut at 4-1/4” x 11” and scored at 5-1/2” in the middle.

2.    The second layer is Pear Pizzazz cardstock cut at 4” x 5-1/4” and inserted into the Layered Leaves TIEF and run through the Big Shot.  Adhere to the front of the card Multipurpose Glue.

3.    Cut Whisper White cardstock at 2-3/4” x 
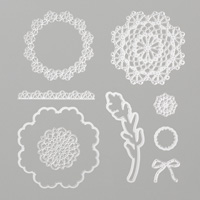
4-1/4”.  Die cut a large doily with the Doily Builder Thinlet Dies from scrap cardstock and layer over Whisper White cardstock.  Holding doily in place as a mask and sponge Gorgeous Grape ink over the doily.  Remove doily.  Layer onto a 3” x 4-1/2” of Gorgeous Grape cardstock.

4.    Using the Stampin’ Markers on the flower stamp (Pear Pizzazz for the leaves and stem; Gorgeous Grape for the flowers).  Huff on them and stamp scrap of Whisper White cardstock.  Die cut three of them out with the Doily Builder Thinlets Dies.

5.    Using Mini Dimensionals adhere over the sponged doily.

6.    Ink up the sentiment with Gorgeous Grape ink and stamp on Whisper White cardstock.  Punch out with the 1-1/4” Circle Punch.  Punch a scallop circle punch from Gorgeous Grape cardstock with the 1-3/8” Scallop Circle Punch.  Layer together with Multipurpose Glue.  Add Dimensionals to the back and adhere to the front of the card.

7.    Die cut a Gorgeous Grape bow with the Doily Builder Thinlets.

8.    Put Dimensionals on the back of the layered cardstock and attach to the front of the card.
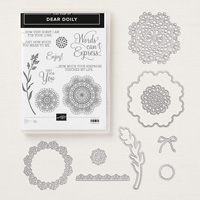
Products I used:


Friday, September 23, 2016

Suite Seasons and Jar of Haunts

These little treat holder ideas were from a video I watched of Lisa Brown's so I knew I had to make some to insert my little candies.  The sentiments come from Jar of Haunts and Suite Seasons.  I stamped each sentiment on Whisper White cardstock with Memento Black Ink.  Then I used the 1-3/4" Circle Punch to punch them out.  I also used Smoky Slate ink to stamp the ghosts from Spooky Fun, but stamped off once and then stamped over the sentiments.  Then I punched out a 2" circle of Pumpkin Pie cardstock and mounted the sentiment on top.  I used the Pumpkin Pie Glimmer Paper to cut out a bat from the Halloween Scenes Edgelits and attached it with a Glue Dot.  For the bag, I used the Halloween Night Specialty DSP and cut it at 4" x 6" and scored it at 1-1/2" and 4-1/4" on the 6" side, and 1/2" on the 4" side.  Then I folded the score lines and burnished them with a Bone Folder.  I cut off the two end rectangles and trimmed thin wedges to give the bag a nicer finished look.  I applied adhesive to the sides and then the flap to create the bag.  Insert the candy.  Attach the circle with Dimensionals leaving room for the Halloween Night Baker's Twine on the right side.

Products I used:

Saturday, March 26, 2016

Birthday Slider Card

This is called a slider card.  I saw a video posted by Dawn Griffith on how to make these slider cards.
I used the Washi Label Punch to create the candles and the Bird Builder Punch to create the flame on the candle.

Here are more instructions on how to make this card:


Stamp Set:  Circle of Spring, Party with Cake (2016 Occasions)
Cardstock:  Melon Mambo, Whisper White, It’s My Party DSP, Gold Glimmer Paper, Silver, Glimmer Paper
Ink:  Archival Basic Black
Other:  1” Circle Punch, 1-3/4” Circle Punch, 2” Circle Punch, Paper Snips, Dimensionals, Snail Adhesive, Washi Label Punch, Bird Builder Punch

1.      Base of card is 4-1/4” x 11” and scored at 5-1/2” in the middle.
2.     The second layer is Whisper White cardstock cut at 4” x 5-1/4”.
3.     The third layer is It’s My Party DSP cut at 3-3/4” x 5”.
4.     Start with the 1” Circle Punch by aligning punch to one side of the DSP.  Do the other side the exact same way.  Once you have the two holes, you connect them by cutting with your Paper Snips from one circle to the other.
5.     Another piece you will need is Melon Mambo cut a panel at 1-1/4” x 4-1/2”.
6.     Turn over DSP and place panel across the hole.  Use the long borders from the Dimensionals and line it up close to the panel on either side.  Put 4 or 5 full Dimensionals on the back below the panel.  Pull off backings and position onto the 4” x 5-1/4” Whisper White cardstock.
7.     Ink up “Make a wish” with the Basic Black Archival ink and stamp on the inside on the Whisper White cardstock to the very far right side.  Layer onto the base card.
8.     Stamp “Happy Birthday to you” with Basic Black Archival Black on a scrap of Whisper White cardstock.  Use the 1-3/4” Circle Punch to punch it out.  Punch out a 2” Melon Mambo circle with the 2” Circle Punch.  Layer together with Snail Adhesive.
9.     Then slide in your Melon Mambo panel and slide it over to the left to see where the right end will be and place a Dimensional on the Melon Mambo panel on the right side to serve as a blocker so the panel won’t go any further or fall out when you pull it to reveal the message.
10.   Add circle greeting on that Dimensional and make sure it is all the way to the right before you trim off the excess on the left side of your panel so it will be able to fit inside a regular-sized envelope.
11.    Using the Silver Glimmer Paper, punch out a 1” Circle and fold in half to attach to the left side of the panel to use as the pulley for the arm panel which makes it easy to grip when you pull it.
12.   Using the Washi Label Punch, punch out three candles from the Silver Glimmer Paper.  Put Snail Adhesive on the back and attach to the front of the card.
13.   Using the Bird Builder Punch, use the wing as the flame for the candles by cutting out three from the Gold Glimmer Paper.  Attach Dimensionals to the flames to add to the candles on the front of the card.

Tuesday, May 28, 2013

Happy Father's Day Beer Mug

 
This is my Happy Father's Day card that could also be a masculine Happy Birthday card.  I used the Woodgrain background stamp with Soft Suede card stock and adhered to Whisper White folded card stock.  To make the mug I used a  3" x 31/2" of Whisper White and used a corner rounder punch on all four sides.  To make the handle is I used the Oval Punches to make the mug handle by first punching the smaller oval on a piece of Whisper White cardstock and then taking the larger oval punch over where I just punched.  The beverage is made by using 3 pieces of So Saffron card stock at 7/8" x 3 3/4" cardstock and used the corner rounder punch on them as well.  I sponged all three with So Saffron ink and stamped Happy Father's Day in Soft Suede on one of them.
To make the foam, I used the 1 1/2" Circle punch on Whisper White card stock and punched out 3.  Then I punched out 5 circles with the 3/4" Circle Punch, 1 of the 1/2 circle punch, and 5 of the Itty Bitty Scallop Punch.  Each was adhered with dimensionals.
 

Easter Basket

Yes, I know Easter isn't until April this year, but as it gets closer, most of the items for this card will probably be hard to get beca...