Wednesday, December 23, 2020
Life is Beautiful
Friday, December 11, 2020
Home Together Dies - I'm Back!
Hi All,
I've not been posting on my blog since October because I had a complete knee replacement, so I've been healing and going for physical therapy. I haven't felt like being creative, but hoping to get back into it very soon. Since today is my birthday, I thought I would show you what I have been doing. I decorated a little lighted tree which took me several weeks because it was hard to get up and down from my chair each time I needed something. The idea came from Cyndi Johnson.
1. For
the Birdhouses: Cut Whisper White cardstock at 3” x 3” and score at 1” on all
four sides to create the house cube. Use the heart-cut die to cut two from
Cherry Cobbler or Shaded Spruce. For the
solid house dies, cut two from Whisper White cardstock. Glue pieces together and add to two of the
sides.
2. For the Roof: Cut 2-1/4” x 1-3/8” from
Whisper White and the same from the DSP.
Score in half. Punch a hole in
the middle of the scoreline and add a loop of the Gold Ribbon on the Whisper
White Roof. Adhere the DSP to the White
Roof.
3. The trees and snowflakes were made with the
Home Together and So Many Snowflake Dies.
The trees from the DSP are two-sides using the Adhesive Sheets (I cut
one Shaded Spruce tree and adhered the Gold Ribbon for the loop and then
adhering the DSP trees to both sides).
Do the same for the snowflakes cutting one Whisper White snowflake,
adhering the loop, and then attach the adhesive snowflakes to each side. The
adhesive sheets make it so much easier.
Saturday, October 17, 2020
Sunday, October 11, 2020
Christmas Means More
I love this sentiment from the movie "It's a Wonderful Life" with Jimmy Stewart. This stamp set is called Christmas Means More and there are other sentiments in this set that I like too. This card was inspired by Mary Fish, although I didn't have the same ribbon she had which was the Shaded Spruce Wonder of the Season Ribbon Combo Pack. I used her measurements for my card.
1. The base of the card is 4-1/4” x 11” and
scored at 3-1/2” and 9.
2. Cut the Tis the Season DSP at 3-1/4” x 4”
and 1-3/4” x 4.
3. Whisper White cardstock is die cut with the
Stitched Shape Dies at 2-5/8” Square and with the Stitched Rectangle Dies at
3-3/8” x 4-3/4”.
4. Cut the Shaded Spruce cardstock at 3-1/8”
square and the Cherry Cobbler cardstock at 2-7/8” square.
5. Adhere the DSP to outside flaps of the
cards with Stampin’ Seal Adhesive.
6. Adhere half the Shaded Spruce square to the
left side with Stampin’ Seal Adhesive.
7. Cut the Silver Metallic Edge Ribbon about
14”. Use Stampin’ Seal to attach the
ribbon on the Shaded Spruce square and then wrap around the entire card.
8. Attach two Jingle Bells to some Metallic
Mesh Ribbon and tie it all together in a bow on the side.
9. Ink up the sentiment with Shaded Spruce ink
and stamp on the Whisper White Stitched Shape Square. Adhere to the Cherry Cobbler Square with Seal
Adhesive.
10. Attach to Shaded Spruce Square with Seal
Adhesive or Dimensionals.
11. Color the bells with Smoky Slate
Blends. Add Wink of Stella.
Products I used:
Product ListFriday, October 9, 2020
Rooted in Nature - Thank you Card
Product List
Wednesday, October 7, 2020
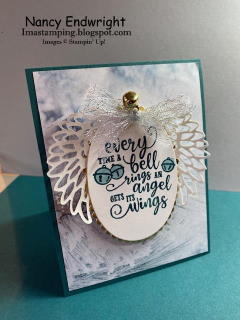
Christmas Means More - Angel-Dove Wings
Product List
Dove of Hope Case
Product List
Valentine Kisses - Shaker Card
This shaker card was inspired by Erica Cerwin, but I changed the ribbon and colored it with a Real Red Blend instead of keeping the Bubble B...

-
Just finished making this fun waterfall card this morning. I love making waterfall cards, so I had to play around with thi...
-
Do you like to chew gum? Have you bought the gum holders with the plastic case? What do you do with the empty case when you are done with ...
-
Who would like to receive a birthday card with a wobble inside? My club remembers had fun making this card last Sunday and I decided to use...


