I just love the Scentsational Season stamp set and framelit die. After January 1, it can no longer be ordered unless Stampin' Up! puts it in their 2013 Catalog. This idea was cased from another demo, Dawn Olchefske. The little Merry Christmas tag is a stamp from Petite Pairs and I made the tag by using the Decorative Label Punch. Isn't it just darling? I made these for my club members this year for Christmas. The ink colors used are Gumball Green, Cherry Cobbler, Early Expresso. The paper is Very Vanilla, Early Expresso, Crumb Cake and Be of Good Cheer DSP. The accessories used were the Big Shot, Simply Scored Scoring Tool and Diagonal Plate, 2 1/2" Circle Punch, 1/4" Cherry Cobbler Sweater Trim, Rhinestone Jewl, Sticky Strip, Snail Adhesive, Dimensional, Crop-a-Dile, Self Healing Mat, Cocoa Packet and Candy Stick.
Showing posts with label Christmas. Show all posts
Friday, December 7, 2012
Saturday, December 1, 2012
Scentsational Gingerbread Season
It's December 1st, so time to start adding some of the Christmas ideas I have been making onto my blog. This little gingerbread boy is from the Holiday Catalog called "Scentsational Season" and after January 2, 2013, you won't be able to order him unless he appears in the catalog next June. The set also has a Christmas tree, mug and steam, and a candy cane. It also has framelit dies to match and I was able to purchase both through a Scentsational Season bundle, a savings of 15%. The colors I used are Soft Suede for the gingerbread boy on Whisper White cardstock. His buttons are little brads from the Brights Collection. I used dimensionals to layer him onto Real Red cardstock cut from a the Labels Collection Framelit die. I made some of these at Halloween, so used the same pattern I used previously and attached him to a Gumball Green cardstock belly band to slide over the container which uses Real Red cardstock and Be of Good Cheer DSP.
Inside is a Word Window Punch hole to insert a snack-size Hershey's candy bar.
Thursday, November 8, 2012
Snowflake Soiree
Snowflake Soiree
I love making these triple time stamping cards. I made this one using the Snowflake Soiree stamp set. I used Island Indigo card stock and 3/8" Island Indigo Ruffled Ribbon.
Using Whisper White card stock, cut 2" x 3 1/4", 3" x 4 1/4" and 4" x 5 1/4". Use a bit of Dotto or a couple dabs of Snail to temporarily tack down the three layers on top of each other. Randomly stamp the bigger snowflake with Island Indigo ink, but don't worry about any white gaps you might see because you won't notice these later on. Stamp the smaller snowflake with Pool Party ink. Next, you will cut your Island Indigo card stock at 2 1/4" x 3 1/2" , 3 1/4" x 4 1/2", 5 1/2" x 8 1/2" folded in half for card base. Once you are done stamping the Whisper White card stock, layer onto the Island Indigo using Snail Adhesive. Make sure you keep your stamped images in the correct direction as you adhere them together. Add your ribbon. I made a bow and adhered with a Mini Glue Dot.Saturday, August 25, 2012
Ginger Bread Boy Spinner
This my latest swap card and I couldn't wait to make this little guy into a spinner card. We were to use the embossng folder and a Framelit. I made two versions because the little guy kept catching on the embossed folder. I added the Cherry Cobbler 1/2" Scallop Dots Ribbon but it needs to be high enough that he doesn't catch on it too. The stamp set is from the new Scentsational Season stamp set and the Holiday Collection Framelits, but I also used Got Treats stamp set for the verse "Got Merry?" I also used Be of Good Cheer DSP. The colors are Very Vanilla, Cherry Cobbler and Soft Suede. I used the Word Window Punch and the Modern Label Punch. The Embossing Folder is called Houndstooth. Some of the accessories I used were double-sided tape, two pennies. I also used Dimensionals and Pearl Basic Jewels.
Saturday, July 14, 2012
Chock-Full of Cheer Candy Canes
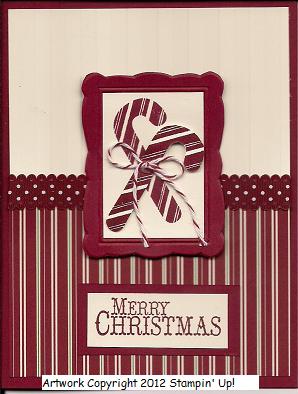
Here is another Christmas card that I made with the stamp set Chock-Full of Cheer stamp set. I also used the Designer Series Paper called Be of Good Cheer. Cherry Cobbler is one of my favoite colors of red ink, so I had to use the 1/2" Scallop Dots Cherry Cobbler Ribbon and the Cherry Cobbler Baker's Twine on my card. I used the Very Vanilla card stock in the Stripes Embossing Folder. Using the Big Shot, I enclosed a piece of Cherry Cobbler card stock into the Designer Frames Folder. I stamped one candy on a piece of Very Vanilla cardstock and the other candy cane on a another piece and cut it out and attached with a Dimensional.
Thursday, July 12, 2012
Chock-Full of Cheer Mittens
It's not too early to start thinking about making Christmas cards. The stamp set I used to make this card is called Chock-Full of Cheer. It is a new set this year in the Stampin' Up! catalog. Also, new is the Designer Series Paper called Be of Good Cheer and the ribbon is called 3/8" Gumball Green Stitched Satin Ribbon. I used the Stripes Embossing Folder in the Big Shot and the Labels Collection Framelits. I stamped one mitten on Very Vanilla card stock with Cherry Cobbler ink. Then I stamped another one and cut it out and attached it with a Dimensional.
Wednesday, December 28, 2011
Stitched Stocking
This is a card I made using the Flirtatious Specialty DSP by cutting out the laser-cut double sided doily using the Whisper White side. I stamped the Stitched Srocking with the snowflake with Night of Navy ink onto Whisper White cardstock. Then I used the Stitched Stocking Punch to punch out my Stitched Stocking. I added Dimensionals on the back and attached to the front card onto the laser-cut doily. I added a Rhinestone in the center of the snowflake. The little label was made using the Decorative Label Punch. I stamped "Merry Christmas" with the Petite Pairs stamp set onto Whisper White cardstock. Then I took the punch and only punched half. I then took a post-it note so that I could reinsert it into the punch and to make sure by little label are rounded and equal on both sides. I sponged the edges with Night of Navy ink and attached it with Dimensionals.
Delicate Doily Wreath
This is a card I made using the Delicate Doilies stamp set. First, I inked up the large doily with Versamark and then Old Olive ink. I embossed it with Clear Embossing.
Then I colored it with an Old Oliver marker. I punched out the center with the 1" Circle Punch and the 2 1/2" Circle Punch. I attached Dimenionals to the back of the wreath and layered onto a piece of 3" x 3" Cherry Cobbler cardstock and 3 1/4"x 3 1/4" Olive cardstock. I stamped "Merry Christmas" in Old Oliver at the bottom of the Whisper White cardstock using the Four the Holidays stamp set. The bow was made using a fork using Cherry Cobbler 1/2" Seam Binding. The rhinestones were colored in with a Sharpie.
Saturday, December 17, 2011
Stocking Dies
Sorry, I haven't posted in quite awhile but I've had some health issues recently that have put me behind in postings as well as stamping. Here are a few more stocking dies that I have created. I just love making these stockings.
I used the Christmas Lodge DSP to create this stocking as well as Cherry Cobbler Card stock, plus the Stocking Accents die to make the holly. Here is another one using the Christmas Lodge DSP with Marinia Mist Card stock.
Saturday, November 19, 2011
Holiday Stocking Die with Accents
This is the first Holiday Stocking that I made using the Holiday Stocking Bigz L Die #124098 as well as the Stocking Accents #124099 in the Holiday Mini 2011. I just love making these stockings and there are so many ideas to choose to create them. They can be made as a gift card holder, as a folded card, or attaching a box between two stockings. The DSP is used is also from the Holiday Mini called Holly Berry Bouquet #124004 The colors I used to make the stocking are Wild Wasabi and Cherry Cobbler. I also used a sponge around the edges to give the stocking more depth. I'm off to make some more and will post them later.
Sunday, November 13, 2011
Stitched Stocking for Christmas
This is another take from the previous card I posted today. Isn't the little label adorable? This punch technique idea using the Decorative Label Punch was from Patty Bennett, a very, talented fellow demo.
The stamp sets I used for this card are Stitched Stockings and Serene Snowflakes, Petite Pairs. The cardstock is Night of Navy, Whisper White, Baja Breeze. The ink is Night of Navy and Craft White. Other item used are Iridescent Ice Embossing Powder, Decorative Label Punch (made into a mini label), Dimensionals, Baja Breeze Seam Binding Ribbon, Snow Burst Embossing Folder, Big Shot, Snail Adhesive, Dauber, Heat Tool, Versamarker, Stocking Builder Punch, Basic Rhinestones
Insert the Baja Breeze Cs into the Snow Burst embossing folder and emboss it with the Big Shot. Lightly tap White Craft ink onto the embossed snowflakes until they are as white as you would like them to be. Sprinkle on Iridescent Ice embossing powder and heat with the Heat Tool to melt. Ink up the Serene Snowflake with Night of Navy and stamp it randomly on the Whisper White cardstock. Ink up the Stitched Stocking stamp with Night of Navy and stamp on the scrap of Whisper White cs. Punch it out with the Stocking Builder Punch. Use the Versamarker on the heel, toe and top of the stocking. Sprinkle on Iridescent Ice embossing powder and heat with the Heat Tool to melt. Attach a small Basic Rhinestone on the center of the snowflake on the stocking. Put two Dimensionals on the back and attach to the Whisper White cs and then layer it onto the of Navy cs. Lay a piece of Baja Breeze seam binding ribbon across the Baja Breeze cs, so that it covers the bottom of the Whisper White cs stamped with snowflakes. Bring the ends of the ribbon around to the back and stick them down using Snail Adhesive and attach to the front of the Night of Navy folded card. Attach the punched out stocking over the ribbon. Stamp the “Merry Christmas” from Petite Pairs on the side of a scrap of Whisper White cs. Use the Decorative Label Punch to punch so that the verse is turned sideways to the left. Now take a post it note piece of paper to hold the half-punch and turn it so that it has two rounded sides on either side to match and to create the mini decorative label. Attach with Dimensional to the bottom right of the card. Don't you just love this little mini label. Now, we can use this punch to make two different size labels.
Snowburst Christmas
This card design was cased from Andrea Walford, a Canadian papercrafter and also from Patty Bennett, a fellow-demo in the USA. I combined both their ideas into this one card. The new Snowburst Embossing Folder in the Holiday Mini is my new favorite. I used Baja Breeze to run it through the Big Shot. Then I used White Craft Ink to rub over it and sprinkled with Iridescent Ice EP and heat embossed. That technique was from Andrea. The technique from Patty is that I cut out a laser-cut doily from the Flirtatious Specialty Designer Paper using the Whisper White side of the doily and attached it with 2-way Glue Pen to the front of my card. Then, I used the new stamp set Stitched Stocking with Night of Navy and punched it out with the new Stocking Builder Punch and attached two Dimensionals on the back to adhere to the front of the doily. I used a Rhinestone on the center of the snowflake on the stocking. I also embossed the cuff, heel and toe of the stocking with 2-way glue pen and Iridescent Ice EP. I stamped “Season’s Greetings” from the set Many Merry Messages. I also used the Baja Breeze Seam Binding Ribbon and tied the bow using the fork technique that I learned from You Tube.
Subscribe to:
Posts (Atom)
Glow of Harvest with Painted Pumpkins
This is a card using the Designer Series Paper Glow of Harvest, which was $5 with an order of $75 or more. Then, I used the masks to make ...
-
Just couldn't resist making another card using the Swirly Scribbles Thinlets to make a snowman. Seongsook Duncan had posted her vers...
-
This card uses a lot of the new products in the 2016-2017 Annual Stampin' Up! Catalog. The new stamp set is called Seaside Shor...
-
Just finished making this fun waterfall card this morning. I love making waterfall cards, so I had to play around with thi...